File Management
The text editor File menu has several commands for standard file
management. With these commands you can perform the following actions:
All file operations are performed by using the builtin
Explorer Window. You can use an open
Explorer Window to open a file at any time.
The New command creates a new source file. Creating a source file
does not affect other open source files.
To create a new file
- From the File menu, choose New. A new document window (in the
default mode) will appear.
- From the File menu, choose Save. A new
Explorer Window in File Save mode appears.
- Select a path where you want to store the source file.
- In the File Name box, type a file name. If the you are about
to store a program file, a .PROG file extension is added by
default. You can type another extension.
- Choose the Save button.
New files are labeled Progn until they are saved.
The n is a sequential number.
When you open a source file, its name is added to the Window menu.
You cannot use the Open command on the File menu to open another copy
of an open source file.
To open a file
- Select the file in an already open
Explorer Window
- or -
From the File menu, choose Open. A new Explorer Window appears.
Select the drive and directory where the file is stored.
- If you want to read only, select the Read Only check box.
Note You cannot edit a file which was opened Read Only, unless
you change the document properties.
- Specify the types of files to display by selecting the apropriate
file filter in the Explorer Window.
- Select a filename, then choose the Open button.
- or -
Double-click the filename.
You can also open a file by dragging the icon into the application window.
Tip The names of the four most recently opened files are displayed
at the end of the File menu. To open one of these files, choose its name
from the menu.
Note The number of files on the list of most recently opened
files is controlled by the FileCount item in the Registry.
You can open multiple files from the
Explorer Window by using the mouse
to select a file or group of files.
To open two or more files in sequence
- Use an already open Explorer Window
- or -
From the File menu, choose Open. A new Explorer Window appears.
Select the drive and directory where the files are stored.
- Specify the types of files to display by selecting the apropriate
file filter in the Explorer Window.
- Click the first file or directory you want to select.
- Hold down the SHIFT key while you click the last file or directory
in the group, and then choose the Open button.
To open two or more files out of sequence
- Use an already open Explorer Window
- or -
From the File menu, choose Open. A new Explorer Window appears.
Select the drive and directory where the files are stored.
- Specify the types of files to display by selecting the apropriate
file filter in the Explorer Window.
- Hold down the CTRL key while you click each file or directory
that you want. Once your selection is complete, choose the Open button.
To cancel a selection, hold down CTRL while you click the selected
file or directory.
With Eloquence A.06.00, program files can be password-protected.
When a password-protected file is loaded, the following steps are
taken:
- The password is automatically checked against the
password configuration.
If one of the configured passwords matches the password of the file,
the file will be loaded and displayed in an editor window.
- If step 1 fails, a dialog is opened where the password can be
entered:
If the password you have entered does not match the password of the
file, you have two more tries before the password validation will fail.
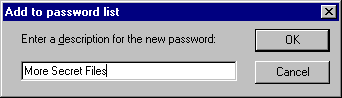
You can check the "add to password list" option if you want the new
password to be added automatically to your
password configuration.
If this option is checked and the new password could be successfully
verified, another dialog is opened which asks you for a description of
the new password. This description is required in order to add the new
password to your configuration:
- If the password you entered matches the password of the file, the
file will be loaded and displayed in an editor window. Otherwise, the
file will not be loaded. If it had to be loaded during a debug session,
the Call Stack window is opened instead.
As you make changes to a source file, an asterisk (*) appears in the
title bar to indicate that the file has changed since it was last saved.
To save a file
- Switch to the source window.
- From the File menu, choose Save. If you already named the file,
the Save command saves the changes without displaying the Save As
dialog box.
If your file is unnamed, the
Explorer Window in File Save mode
appears.
- Select the drive and directory where the you want to save the file.
- In the File Name box, type the filename.
- Choose the Save button.
To save all open files
- From the File menu, choose Save All.
You can also save another copy of an existing file. This procedure is
useful for maintaining revised copies of a file while keeping the
original unchanged.
To save a new file or another copy of an existing file
- Make the file active by clicking the source window.
- From the File menu, choose Save As.
An Explorer Window in File Save mode
appears.
- Select the drive and the directory where you want to save the file.
- In the File Name box, type the filename.
- Choose the Save button.
With the text editor, you can print selected text or a complete file.
Text is printed using the Courier New, if available, or the Courier
font.
You can customize your print jobs by adding headers and footers, by
adjusting margins and selecting the font size and weight. Additionally,
you can specify if program files will be printed with line numbers.
To print selected text in a source file
- Select the text you want to print.
- From the File menu, choose Print.
The Print dialog box appears. Under Print Range, the Selection option
is automatically selected for you.
- Choose the OK button.
To print a complete source file
- Move the focus to the source file you want to print.
- From the File menu, choose Print. The Print dialog box appears.
- Under Print Range, select the All option button.
- Choose the OK button.
To customize a print job
- From the File menu, choose Page Setup. The Page Setup dialog box
appears:
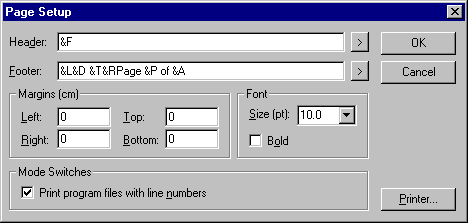
- In the Header and Footer boxes, type the header or footer text,
codes, or both. You can use the drop-list to insert codes into the
text box. The alignment options (left, centered, or right) take
effect for any text following one of the options.
© Copyright 1997 Hewlett-Packard GmbH. All rights reserved.
Revision: 98/02/18